![]()
![]()
![]()
![]()
![]()
![]()
![]()
![]()
Editing Code
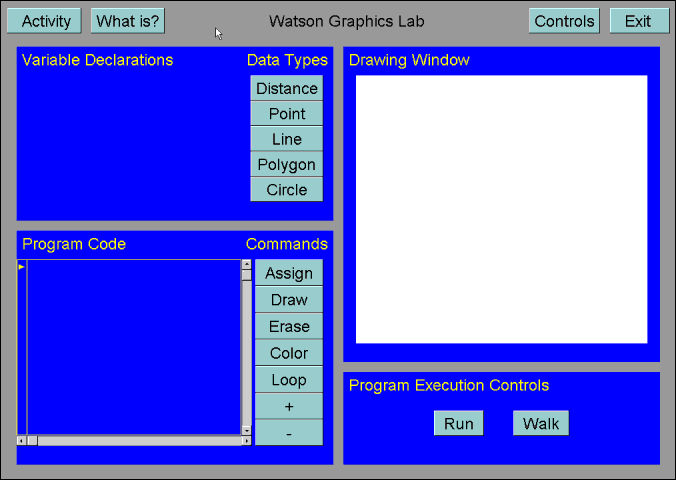
The Watson Graphics Lab works in two ways. You can either input program code
or draw interactively.
Entering program code
- To begin using the lab, open the Choice Selection Panel by pressing the Activity button on the Watson Control Bar. From this panel you can choose to look at an example, work an activity, or practice on the scratchpad.
- To start writing a program you must first declare some variables. Choose the variables you will need by clicking the corresponding Data Type buttons. Notice how your variables will all be shown in the Variable Declarations window.
- Now to write some code. To insert commands, click on one of the seven Commands
buttons. Notice how after choosing a command it is shown in the Program Code
window written in capital letters. When a segment of code is written in capital
letters it is unassigned. To assign values to code click on the code segment.
When either a Choice Selection Panel or a Numeric Entry Pad pops
up select an object or a value.
Note: Program code that can be changed will turn from yellow to red when the cursor is passed over it. Most code can be changed at any time. However, when a segment of code is written in all capital letters it must be changed prior to execution.
- To insert a code segment click the vertical region on the left side of the Program Code window. To delete a code segment click on the small circle directly left of the segment to be deleted.
Inserting / Deleting Code

After writing the code your program is ready to run. Simply press the Run button under the Program Execution Controls to make the lab execute your code. To step through your code, line by line, use the Walk button.
Drawing Interactively
- To begin using the lab, open the Choice Selection Panel by pressing the Activity button on the Watson Control Bar. From this panel you can choose to look at an example, work an activity, or practice on the scratchpad.
- To start drawing interactively, choose an object by clicking one of the Data Types buttons.
- Once a variable is declared move the cursor to the Drawing Window and place the object.
- Check out the Program Code window to see the corresponding code that was written.